FLARE | user guides

LET'S MAKE IT A SMOOTH RIDE.

For the best start with our Flare trackers see compiled info about the trackers' operation and YourFlare app. You are always welcome to drop us an email in regard to any questions.

yourflare application use sample
YourFlare settings
Choose user guide

HOW DOES IT WORK?

KidFlare is a GPS tracker made to help parents monitor primary school children. With its reflector, it increases traffic safety while commuting.

Kids will leave home, fetch a bus, stay at school for a while, visit grandparents, music class, extracurricular activities, and in between might decide to climb a tree, explore the area or visit a friend.

With all that in our mind, we have equipped the KidFlare enclosure with a reflective cover and engineered tracking logic to deliver its users frequent enough location updates while saving the battery. All that with pretty smooth features you can discover in later sections.

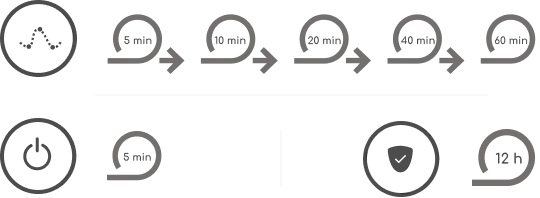
KidFlare tracker utilizes smart data cycles (default 5 min) and motion sensing as its main logical pillars. No need to monitor location each second, right? Well if you have to, you can always do that with a Live tracking feature.

Tracker itself is connected to a mobile network. We made sure it is compatible with the oldest (2G) as well as the most recent technologies such as LTE-M. When available, we use LTE-M, the latest mobile network technology for low-power IoT devices (LPWAN) which continues to be developed alongside 5G and uses significantly less power than older technologies or even regular 4G. However, if LTE-M isn't available in your area, we can switch to using the older 2G network, which is available virtually everywhere around the world. This will guarantee as wide as possible area coverage and the best power consumption. Location is tracked by GNSS, Wi-Fi, and Bluetooth technologies.

KIDFLARE LUMIN outline gradiant

SMART 
DATA CYCLES

Kidflare tracker smart data cycles
To limit the unnecessary use of a battery, Flare trackers operate in sleep-wake-up data cycles and react to moves sensed by an integrated accelerometer. They wake up periodically and:
  1. Fetch the data from GNSS, Wi-Fi, and/or Bluetooth,
  2. Send the data into the FLARE cloud,
  3. Go to sleep mode until the next cycle and/or move
    is detected.
There is some additional intelligence involved, where cycle periods extend if the accelerometer doesn't sense movement:
  • Default data cycle - 5 minutes,
  • When the tracker is not moving, cycles extend 5, 10, 20, and 40 to a max of 60 minutes. Whenever a move is detected the system starts with a 5 min default cycle.
  • When activating the real-time tracking feature, tracking itself will start:
    • After the device wakes up from its sleep cycle (5, 10, 20, 40, or 60min)
    • After movement wakes the device up from cycles longer than 5mins.

LOCATING 
TECHNOLOGIES

  • There are three types of location technologies integrated that can operate together or individually.
  • GNSS

    We use any of GNSS -global navigation satellite systems (GPS, GLONASS, BeiDou, Galileo) to gain information in an outdoor environment. This is the main source of location data.
  • Wi-Fi

    Is used for indoor areas as it passively monitors local Wi-Fi devices' signal strength. With time and the amount of Wi-Fi networks, it becomes more accurate. Wi-Fi is a secondary source and is always working together with GNSS for the most accurate location data.
  • Bluetooth

    Is mostly used for special features such as dynamic friendly zone and/or proximity search. However, it can provide a third source of location data to further improve the total accuracy, depending on the amount of Bluetooth devices in the vicinity.

FLARE 
ACTIVATION

1. START CHARGING THE DEVICE BATTERY

Charge the battery with the USB charging cable.

If you have correctly plugged the USB cable, the red light indicator on the device will turn on. You will notice the red illumination.

After ca. 2 hours of charging the battery will be full and the indicator will turn off.

We suggest completely charging up the battery, but it is not necessary.

2. DOWNLOAD THE YOURFLARE MOBILE APP

Download our free mobile app YourFlare. You can do that by scanning the QR code on the package or fetching it manually at Google Play or Apple Store.

3. REGISTER YOURFLARE USER ACCOUNT AND FILL IN SOME INFO

Open the YourFlare app and create a user account.

Confirm it via email (check out the SPAM folder if you can not find it) and fill in basic user information.

4. PAIR THE TRACKER WITH THE APP

After creating a user account AND after the battery is full, turn on the device by pressing the button.  

You can now pair the device with the help of the "(+)/ADD DEVICE"  button at the bottom of the main screen. Scan the activation QR code you will find within the package (if it doesn't work, make sure the camera allows access to your flare app). Now you can personalize Flare tracker info and at the end claim your subscription bonus.  

Usually, you will have to wait a minute or so for SIM activation to finish.

5. SHARE THE DEVICE AND GET TO KNOW KIDFLARE 

After the device activation is completed, you can share access with other guardians, such as other parents or grandparents.

To do so, swipe up the device image on the bottom part of the main screen to see DEVICE INFO pop up and choose the share option on the bottom right-hand side.

FIRST THINGS TO DO AFTER ACTIVATION

KIDFLARE set up geofence zone

SET UP GEOFENCE ZONES

Click on the “+ add new” button on the geofence menu, name it, enter the address, choose friendly/No Go type, and save your new geofence. You can add as many as you please.
KIDFLARE share tracker with guardian

SHARE KIDFLARE WITH 
OTHER GUARDIANS

You can share the device with a partner and/or other guardians. Slide out the bottom menu for Flare device info. On the bottom side click on the “share” button on the bottom right.

FIGURING OUT THE APP

MAIN SCREEN

KIDFLARE Main screen
This is where most things happen. In the menu bar below you can see your devices and add new ones. Swipe it up for device info. At the top, there are geofence controls, connection and battery statuses, and access to general settings. On the right-hand side, you can choose your preferred map style and see location history.
  1. DEVICE MENU
    • All of your devices will be visible in the device menu.
  2. ADD NEW DEVICE
    • When pairing a new device this is the first button to press. It will open YourFlare scanner so you can scan the QR code within the package.
  3. GEOFENCE ZONES LIST
    • You can see all of the friendly and no-go zone geofences you have created. Click on them for more info.
  4. ADD NEW GEOFENCE ZONE
    • Add friendly or no-go zones. Type in the address, geofence name, and radius.
  5. DEVICE BATTERY STATUS
    • Observe the battery status. When it gets to below 20% you will receive a notification.
  6. SETTINGS
    • Access to general settings where you can switch between languages, manage notifications, control subscriptions, contact support or set up miscellaneous features.
  7. DISTANCE TO THE DEVICE
    • Distance between the KIDFLARE tracker and you.
  8. MAP TYPE
    • Switch between default and satellite maps.
  9. LOCATION HISTORY
    • Press this button to show the location history for the selected device. You can pick a preset or custom history range.
  10. LIVE TRACKING
    • If you need more frequent location updates, press the button. Note that live tracking initiates: 1) at the beginning of the cycle 2) when motion is detected during 10, 20, 40, or 60 min cycles.
  11. LAST LOCATION
    • Whenever you open the app, you will see a FLARE pin indicating the last location of the FLARE device.
  12. DYNAMIC FRIENDLY ZONE
    • Create a dynamic friendly zone (fence) around your mobile phone. You will receive an alert if the kid ventures out of the zone.
Scary FLARE Kidimal
  1. PHOTO
    • Choose the cutest photo of your kid and upload it here.
  2. DEVICE NAME AND STATUS
    • Edit the name of the device and see its current status.
  3. LAST LOCATION
    • This is a very important piece of info as it states when the last relevant location information was gathered. Sometimes the location is not retrieved. Usually, that occurs if there was a weak mobile network connection or if the tracker could not gain relevant information from Wi-Fi and Bluetooth in an indoor environment.
  4. BATTERY STATUS
    • Pretty straightforward. Try to fill it up before it goes below 10%.
  5. LAST CONNECTED
    • KIDFLARE wakes up in 5, 10, 20,40, and 60 min cycles, to get the location and send it via a mobile network.
  6. LAST GEOFENCE
    • A quick check to see the last friendly or No Go geofence location of the KIDFLARE tracker.
  7. REMOVE DEVICE
    • If you want to remove the device this is the button to press. The device's location data will stay available if you ever want to reconnect the device again. Keep in mind location data is tied to your account, so you won't see it anymore if you pair it to a different account.
  8. SHARE 
    • If parents and other guardians want to be connected to the KIDFLARE you can share it here.

INFO SCREEN

KIDFLARE Info screen
Swipe up the menu below for the device info screen. Here you can see more details about the selected device's status, customize its name and picture, and remove or share the device.

FEATURES | TRACKER

SOS

An emergency alert is sent if a child presses the button five times. Guardian will receive an emergency notification with the location.

Pick Me Up

A kid can press the button twice to send you a notification with the location.

FEATURES | YOURFLARE APP

View location

Open the YourFlare app to see the most recent location of your child.

Smart notifications

Receive relevant notifications such as entering/leaving safe and no-go zones.

Friendly zones

Set up an unlimited number of safe zones. Just type in the address and choose preferred radius.

Week history

See all logged locations for up to a week.

Live tracking

Retrieve current location with live tracking option. Live tracking will start at the beginning of a 5 min cycle OR once tracker movement is detected within extended cycles.

Use case: Know the exact location before picking up the kid.

Dynamic friendly zone

Can be used as a mobile safe zone within a range of 100 meters from your mobile phone.

Use case: walking around a new city; visiting a playground.

Proximity child finder

Coming soon

Using BlueTooth signal strength to easier find the kid.

Use case: Finding a kid in a mass of people. Think shopping malls or busy urban environments.

Roaming / Travel

Enables full operation of a device in most of the world.

Use case: If you intend to use a tracking device out of your country. Make sure the destination is covered.

Add-on options | Use only the options that you actually need! 
No-go zones

Special alert about areas you do not wish your child to be around.

Use case: You specifically do not wish for kids to visit certain areas.

Activate for 0,5€ a month. 

Custom geofence

Coming soon

Custom-shaped geofence safe and no-go zones.

Use case: If you need more accurate geofence zones as opposed to default radial shapes.

Activate for 0,5€ a month.

All history

View a complete history of locations.

Activate for 0,5€ a month.

HOW DOES IT WORK?


There is a reason why so many bicycles are stored inside of owners' homes. As a matter of fact, that is the best way to prevent theft even though it takes space and is generally inconvenient.

Bicycles are beautiful but they are not made by IKEA and they don't pay rent. However, most of the +3.000.000 registered thefts a year in the EU occur when bikes are parked outside or placed in storage areas.

BikeFlare combines GPS tracking and motion sensing to give perfect awareness of bike location while having the capacity to immediately know when theft is happening. This smart mobile device connects to a wide range of mobile networks, from the most recent LTE-M to the oldest 2G mobile networks, guaranteeing the widest reach and stability. When available, we use LTE-M, the latest mobile network technology for low-power IoT devices (LPWAN) which continues to be developed alongside 5G and uses significantly less power than older technologies or even regular 4G. However, if LTE-M isn't available in your area, we can switch to using the older 2G network, which is available virtually everywhere around the world.

The tracker itself is hidden, integrated into the handlebar and as such does not change the way the bike appears on the outside. Modules are made to fit into all standard-sized bike handles and can be integrated by any, at least slightly, handy person.

By default BikeFlare tracks bike location in smart data location cycles, so it can operate as long as possible with minimal time between recharges. Users can choose between BASIC MONITORING, ARM ALARM and ACTIVE TRACKING statuses.

BIKEFLARE outline gradiant

THREE OPERATION MODES

BASIC
MONITORING

After the bike is still for 5 minutes, any bike movement will trigger a Bike-Has-Moved notification.

The bike location is monitored during the bike ride in 5 min intervals.

  • ALERTS: Bike-Has-Moved; Geofence arrival/ departure.
  • BATTERY: Up to 2 months.
  • MONITORING: During the ride; 5 minute data cycles.
ARM
ALARM

A highest-level alert will override even the “do-not-disturb” setting on the phone.

The BikeFlare-Alarm alert is triggered by suspicious bike movements. False alert protection is the least sensitive.

At that moment, the app will give the owner options, to view the current location, initiate real-time tracking or activate/ deactivate the sound alarm.

When activating (arming) the system, the owner can choose if the audible alarm goes off together with the BikeFlare-Alarm.

  • ALERTS: BikeFlare-Alarm with audible alarm on or off.
  • BATTERY: Up to 3 months.
  • MONITORING: ARM - Minimal battery consumption.
ACTIVE 
TRACKING

The Active Tracking status is there if you want more frequent and constant location updates or to track the bike in more detail.

An additional tracking option when more accurate and frequent geolocation tracking is needed. The location updates in progressive battery-saving intervals. 

After the bike is left alone for 5 minutes, any bike movement will trigger a Bike-Has-Moved notification.

For even more frequent updates, use the real-time tracking option.

This is the most battery-consumption-intensive mode.

  • ALERTS: Bike-Has-Moved; Geofence arrival/ departure.
  • BATTERY: Up to 14 days.
  • MONITORING: 5 - 60 min; Smart data cycles.

ACTIVE TRACKING

To limit the unnecessary use of the battery, Flare trackers operate in sleep-wake-up data cycles and react to moves sensed by an integrated accelerometer. They wake up periodically and:
  1. Fetch the data from GNSS, Wi-Fi, and/or Bluetooth,
  2. Send the data into the FLARE cloud,
  3. Go into passive mode until the next cycle and/or moveis detected.
BikeFlare tracker smart data cycles
There is some additional intelligence involved, where cycle periods extend if the accelerometer doesn't sense movement. We use data loops as described below:
  • Default data cycle - 5 minutes,
  • When the tracker is not moving, cycles extend 5, 10, 20, and 40 to a max of 60 minutes. Whenever a move is detected the system starts with a 5 min default cycle.
  • When activating the live tracking feature, tracking itself will start:
    • After the device wakes up from its sleep cycle (5, 10, 20, 40, or 60 min),
    • After movement wakes the device up from cycles longer than 5 minutes.

BASIC MONITORING

Default system operation. To minimize battery consumption the bike location is monitored only during the bike ride in 5 min intervals.

It goes to sleep after the bike is still for 5 minutes. Sufficient bike movement will wake the device up and, if not a false alert, trigger a Bike-Has-Moved notification.

The battery can last up to 2 months.

ARMED ALARM 

In ARMED status, the system will try to preserve as much energy as possible. It will wake up every 12 hours. Bike movement will wake the tracker up.

After the system determines if it is a false alert, it will either send the alert or go back to sleep.  

This status can hold up to 3 months between recharges.

LOCATING TECHNOLOGIES

  • We have integrated three types of location technologies that can operate together or individually:
  • GNSS

    We use any of GNSS -global navigation satellite systems (GPS, GLONASS, BeiDou, Galileo) to gain information in an outdoor environment. This is the main source of location data.
  • Wi-Fi

    Is used for indoor areas as it passively monitors local Wi-Fi devices' signal strength. With time and the amount of Wi-Fi networks, it becomes more accurate. Wi-Fi is a secondary source and is always working together with GNSS for the most accurate location data.
  • Bluetooth

    Is mostly used for special features such as Bluetooth fence and/or Bluetooth search. However, it can provide a third source of location data to further improve the total accuracy, depending on the amount of Bluetooth devices in the vicinity.

BIKEFLARE VISIO INTEGRATION

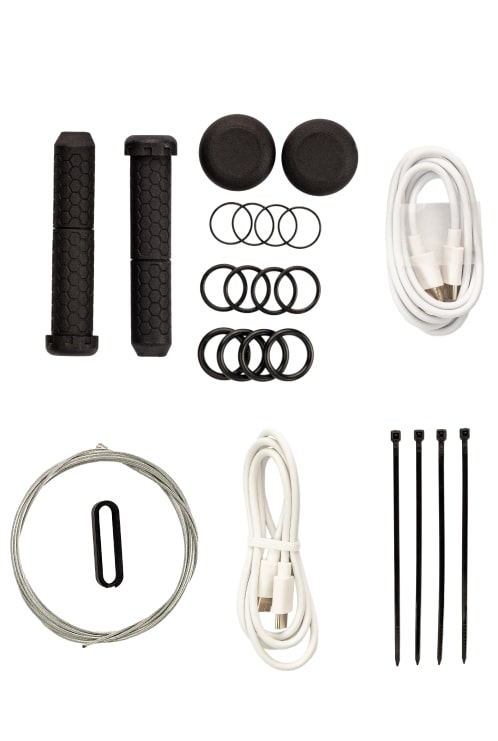
To integrate BikeFlare VISIO please follow the steps below. You will need to 1. PREPARE CONNECTION CABLE to be just the right length for your handlebars. During the second step, you will 2. PREPARE MODULES by figuring out the best-fit O-rings. The last step is about putting it all together.

BIKEFLARE BOX

BIKEFLARE package contents

MODULES 
FIT

Find out which O-ring thickness is the best fit for your handlebar.
  1. Remove the grips.
  2. Test the module fit without O-rings, by sliding it into the handlebar. Take it out. Road racing bikes might demand a third O-ring placed at the hinge.
  3. Now find the best-fitting O-ring. You do not need to insert it in completely, halfway is enough.
  4. If you are satisfied, take it out and put the same O-rings onto the other module.
BIKEFLARE modules fit

CONNECTION 
CABLE PREPARATION

The cable has to cover a wide range of handlebars sizes. In most cases, you will have to make it shorter.  

Measure the needed length of the connection cable. Use zip ties if needed to make it ca. 4-6 cm shorter than the handlebar. This will make sure the cable will not crumple and make it difficult to insert the modules.

For more complex shape handlebars, alternatively, use the drag tool for correct measurements.
  1. Measure the length of the handlebars.
  2. Notice how much shorter the connection cable needs to be. Aim for ca. 2-3 cm shorter than the handlebar on each side (4-6 cm in total).
  3. Use zip ties to fold the cable in its mid part as much as needed and cut off the zip tie residue.
BIKEFLARE connection cable preparation

FINAL 
INTEGRATION

Now we know which O-rings to use as well as have our connection cable prepared. All we need is to finish the integration.
  1. Use the bike cable tool to insert the now already-prepared connection cable into the handlebar.
  2. Connect one of the modules and push it halfway in.
  3. Drag out the connection cable on the other side as well. Remove the tool.
  4. Connect the module on the other side as well and push both in completely.
  5. Start charging the battery module with USB-C to USB-A cable. BikeFlare VISIO is now ready for activation!
BIKEFLARE final integration

BIKEFLARE 
ACTIVATION

1. START CHARGING THE DEVICE BATTERY

Charge via the charger port at the front of the module with the USB charging cable. After ca. 4 hours of charging the battery will be full. We suggest completely charging up the battery before completing installation

IMPORTANT: THE DEVICE WILL TURN ON AUTOMATICALLY ONCE YOU CONNECT TRACKING AND BATTERY MODULES AND MINIMALLY CHARGE IT.

2. DOWNLOAD THE YOURFLARE MOBILE APP

Install our app by scanning the QR code on the package or by manually searching for "YourFlare" in the App Store or on Google Play.

3. REGISTER YOURFLARE USER ACCOUNT AND FILL IN SOME INFO

After launching the app, select your language and press the "Sign Up" button. After signing up, activate your account by following the link you have received over email (check out the SPAM folder if you can not find it) and fill in basic user information.

4. PAIR THE TRACKER WITH THE APP

After activating your account, log in and press the (+) "Add" button in the bottom left. Scan the QR code located inside the box to pair your device.

Usually, you will have to wait a minute or so for activation to finish.

FIGURING OUT THE APP

MAIN SCREEN

BIKEFLARE Main screen
At the top, you can see the tracker status menu, soft geofence alert controls, connection status, battery status, and access to general settings.

On the right-hand side, you have the main ARM/DISARM button with sound alarm on/off buttons. You can switch between map styles, see the location history, quickly go to your default navigation app and switch between map options.
  1. DEVICE MENU
    • All of your devices will be visible in the device menu.
  2. ADD NEW DEVICE
    • When pairing a new device this is the first button to press. It will open YourFlare scanner so you can scan the QR code within the package.
  3. GEOFENCE MENU
    • You can see all of the geofence zones you have created. Click on them for more info.
  4. ADD NEW GEOFENCE ZONE
    • Type in the address, geofence name, and radius.
  5. DEVICE BATTERY STATUS
    • Observe the battery status. When it gets to below 20% you will receive a notification.
    • SETTINGS
      Access to general settings where you can switch between languages, manage notifications, control subscriptions, contact support or set up miscellaneous features.
  6. DISTANCE TO THE DEVICE
    • Distance between the bicycle and your phone.
  7. MAP TYPE
    • Switch between default and satellite maps.
  8. LOCATION HISTORY
    • Press this button to show the location history for the selected device. You can pick a preset or custom history range.
  9. ARM
    • Activate alarm to receive BikeFlare-Alert. You can choose the option with an audible alarm.
  10. LIVE TRACKING
    • If you need more frequent location updates, press the button.

      Note that live tracking initiates
      1. at the beginning of a cycle,
      2. when motion is detected during 10, 20, 40, or 60 min cycles,
      3. if in sleep mode, after its scheduled wake up (max 12 hours).
  11. LAST LOCATION
    • Whenever you open the app, you will see a FLARE pin indicating the last registered location of the FLARE device.
  1. PHOTO
    • The EPIC bicycle photo!
  2. DEVICE NAME AND STATUS
    • Name of tracker and its current status.
  3. OPERATION MODE BAR
    • Switch between BASIC MONITORING, ARM, and ACTIVE TRACKING modes.
  4. BIKE PASSPORT
    • All of the bike information is in one spot.
  5. LAST CONNECTED
    • BikeFlare VISIO wakes up every 5 minutes to get the location and sends it via mobile network to you. Cycles can get longer if the device is not moving.
  6. LAST LOCATION
    • This is a very important piece of info as it states when the last relevant location information was gathered. For example, GPS could not provide location indoors or the device is in a vehicle.
  7. REMOVE DEVICE
    • If you want to remove the device this is the button to press. The device's location data will stay available if you ever want to reconnect with the same device. Keep in mind location data is tied to your account, so you won't see it anymore if you pair/connect it to a different account.
  8. SHARE 
    • You can share device access with family members or friends.

INFO SCREEN

BIKEFLARE info screen
Swipe up the menu below for the device info screen. Here you will find more useful options including device info customization and removing the device.

WHEN THE ALERT OCCURS

ARM Alarm
When parking or storing a bike, press the ARM button and choose should the sound alarm go off or stay silent if moves happen. 

You can always activate the sound alarm later, even during the theft.
Alert
If a move is detected, you will get this notification. 

The application will ask you if you or your close ones moved the bike.

Notification will come with sound even if you have your mobile phone set to silent.
Reacting
Ok, this is a serious situation! 

Your immediate options are:
- See the current location
- Start live tracking*
- Turn on/off the sound alarm

Depending on the situation you can think of the best reaction: Call the police and let them know of the situation and that bike has an integrated tracker. The worst option for way too courageous users would be catching the thief immediately.

In all cases, you will know where your bike is and will be able to plan your move. 

*Live tracking consumes ca. 5% of battery per hour. Please use it strategically as you will still get regular location updates.

FEATURES | YOURFLARE APP

View bike location

Open the YourFlare app to see the most recent location of your bicycle.

ARM alarm

Arm the tracker to react to unplanned motion. It can be activated without a sound alarm.

Alert notifications

Receive alert notifications including the procedure after the bike motion is detected and the system is armed.

geofence alert

Set geofence (e.g. home) to receive notifications when the bike leaves or enters the area.

Use case: Monitor if bikes move from a parking location even if it is not ARMED.

Bicycle passport

All relevant information about your bike at one place.

Use case: In case of theft, all bike info at one place. It will also include the last bicycle locations.

Live tracking

Retrieve the current location in few-second cycles with a live tracking option.

Use case: The strength of Bluetooth signal will be stronger the closer you get to the bike.

Week history

See all logged locations for up to a week.

Parked Bike Search

Coming soon

Find a bike in outdoor or indoor parking areas with help of Bluetooth signal strength. The operational range is up to 100m.

Use case: If you are not sure where your bike is exactly. Strength of the bluetooth signal will be stronger the closer you get to the bike. 

Icon Roaming Travel
GLOBAL COVERAGE

Enables full operation of the device in 130 countries.

Add-on options | Use only the options that you actually need! 
Custom geofence

Coming soon

Custom-shaped geofence zones.

Use case: If you need more accurate geofence zones as opposed to default radial shapes.

Activate for 0,5€ a month.

All history

View a complete history of locations.

Activate for 0,5€ a month.

KidFlare Lumin
 64,00 €
BikeFlare Visio
 129,00 €